Pages

Monday, June 20, 2016

Happy Father's Day!

Yes, I know that was yesterday, but Father's Day sorta snuck up on me this year and I was in panic mode!   Fortunately, Mary at SVG Cuts came to the rescue with some box cards that really wowed the recipients.  This one was for DH and I enjoyed tremendously making it because the technique is very different.  So, watch the tutorial first and do NOT embellish the inserts until they have been glued in place.  No prizes for guessing why I'm passing on this tip!  Now, would it be possible to make this into a jewelry case or a make-up box?  Hmmmm! 


This box card was for my DSIL, long suffering Dada to Master J. I had a piece left over with this one and still have no idea where it goes!


This one was for my DS,  father of our beautiful, well behaved, and always obedient DGDs!  He is a great BBQ chef.  I used Glossy Accents on the six pack bottles to make them look more authentic.  Then, while they were still wet, I absentmindedly put a piece of paper on top of them!  Oh, well!  Two coats of Glossy Accents are better than one right?


Hoping that everyone had a wonderful day and I have every intention of having cards done by the end of May next year!   Thanks for visiting with me today and please pop back on Wednesday for my blog post for Sheila at She's a Sassy Lady.  I'll be sharing my experiences with the Anna Griffin Fabulous Flip Card dies.  : )  Christine


Tuesday, June 14, 2016

Yellowstone Bears

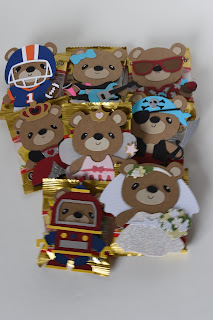
Here's the little project I took with me to Yellowstone - 24 three inch bears from the Teddy Bear Parade cart all cut out and ready for assembly.


My DGDs and I cut this same Pirate Bear a couple of years ago using the Baby Bug.  Let me tell you that using the Explore was a whole different and much easier experience! 

*  All the pieces arrive on the canvas at the same time rather than having to pick out each piece individually to place on the mat 

*DS colors the images so you can see exactly how each one fits together

*Resizing is a one time adjustment.

He is sooo cute!


I attached a small bag of miniature gummi bears behind each one.  I apologize for the out of focus photo.  While C and I were assembling the bears, our DHs were on a Photography Tour of the park and I haven't been able to recover my usual camera settings. : (   


Here's a picture of a (real!) bear he took on the tour.  C and I took a Wildlife Tour later that week and WE saw two yearling grizzlies AND a momma bear with two cubs so we felt that we won the prize for bear sightings!


Thanks for visiting with me today : ) Christine

Thursday, June 9, 2016

Hermoine?

Just two more days before we return home from our camping trip to Yellowstone National Park but yahoo! we have WiFi at the campground here in Twin Falls.
It has been an amazing experience and I have so much admiration for the Park Rangers as they try to balance people's desire to experience all the park has to offer, with their primary charge, the care of the natural wonders and the wildlife.  Sadly, there were a couple of tragedies while we were in the Park.
Today I want to show you a card I made for my DGD who is transitioning from elementary school to middle school in September.
S is a Harry Potter fan and when the Motivation Monday challenge asked for a graduation card using school colors, I immediately thought of this image from Wizard Academy by Pretty Paper Pretty Ribbons.


I was able to reconfigure her arms so that she is holding a wand instead of books.   The sentiment stamps both inside and outside come from Design By Sassy.


Happily, S LOVED her card!   Thanks for visiting with me today.  Back on the road tomorrow : )  Christine

Wednesday, June 1, 2016

Just Chicken In!

One of my ongoing resolutions is to send more random cards through the mail.   I'm just not good at creating them and getting them mailed.  I myself, love to get snail mail from friends and family.  I should just do it! Right?

Anyway, I made this card for my sister from a sketch.  The border across the bottom of the sketch reminded me of a fence, I had just unmounted this old CTMH stamp set, and eureka! The card was born. 


The scene on the front was created from images from Luau, Country Life, My Community and Hello Kitty Greetings.  I snipped away the cartoonish chicken that came attached to the fence and replaced it with this one from My Community.   Much nicer and she reminds me of Violet who is Numero Uno in my chicken coop!


The inner sentiment was written with the Explore and the font is Chloe.

Now I just need to get it in the mail!   Thanks for visiting with me today.  : )  Christine


Sunday, May 29, 2016

Mr. Incredible Window Card

I called my daughter and asked, "Does DSIL like The Incredibles movie?"  "Well," she replied, "J (my grandson) does!"   Close enough, right?  Here's the birthday card for my DSIL featuring Mr. Incredible because... he is Mr. Incredible!


The base of the card is a window card pioneered many years ago by Sheila, of the She's A Sassy Lady blog using the Gypsy and the Cricut Expression.  Of course, it's much easier to create this type of card using DS and the Explore.  For one thing, the larger screen of my laptop is much easier to the eyes, and secondly, designing on the virtual canvas gives a good feel for the look and size of the finished project. 


Mr. Incredible's shadow layer and the speech bubble layer are welded to the frame of the window card.  This adds stability to the card and it looks 'finished' on the inside.  The window card style requires that the outside design continues on the inside and this makes the card such fun to make and fun to receive.  Here's the innies:-


Happy Birthday D!  Thank you all for visiting with me today  : )  Christine


Wednesday, May 25, 2016

Stardust Tea Light Birthday Card

It's my day on the She's a Sassy Lady blog and I'm sharing a card that I made for my youngest DGD's recent birthday.

Rarely, rarely, does this happen, but when I received my new stamps from DesignwithSassy, a card  just popped in my head AND it worked out just the way I hoped!  Ta da!


 I needed a simple tent card, so I placed a square on the DS canvas and sized it at 5" by 10" to form the card base.  It would have been easy peasy to add a variety of differently sized stars on the lower half of the card and attach to make the star shaped cut outs.  Unfortunately,  I wanted to use the "Star in Square" image from the Artbooking cart because I like the way the stars fit at the edges!


I discovered that I was unable to use the contour button to hide the outer square and therefore could not 'attach' the image to the front of the card to cut out the stars.  Soooo, the only way I could make it work was to slice a square in the front of the card base and then weld in the "Star in Square" image.  Yes!!!  Then I attached the score line and voila!


To finish the card I glued on the Accented Star from the Home Decor cart and added a square of platinum vellum behind the stars.  I placed a frame around the outside and inside of the stars panel to finish it off neatly.  Inside I attached the Shooting Stars frame from Artbooking and used my MISTI to stamp the inspirational stardust sentiment from the Happy Birthday collection.


A length of silver ribbon and I was done!


It looks so pretty with the tea light placed inside the card, don't you think?  Then, of course, I had to craft a box since an envelope could not contain both the card and tea light!


Thank you for visiting with me today : )  Christine

Friday, May 20, 2016

Cookie Monster Treats

Unfortunately, (and don't get me started!) at this time of year, the schools around here go into high stakes testing mode.   Translation - stressed out children, teachers, principals and administrations.  To try and alleviate matters, the teachers encourage parents and volunteers to provide little extras for the students that they can snack on or drink during breaks. 

This year, I bought little packets of Chips Ahoy cookies and decorated them with a belly band with an encouraging message and a cute little Cookie Monster image from the Sesame Street Font cartridge.


How cute is that?  The band was cut at 7.5 inches wide to allow for plenty of overlap, and Cookie Monster was cut at 1.2 inches high.  I also made a batch for the OHM shelter children.


This was fun and easy peasy little project, but I don't want to see Cookie Monster eyes again for a long time!   Thanks for visiting with me today.   : )  Christine
 
Blogger Template By Designer Blogs