Pages

Sunday, July 31, 2016

That Jennifer McQuire...

She can sell me ANYTHING!  Once I'd watched her video on layering with monochromatic inks, (https://www.youtube.com/watch?v=wp2RSg3Oo5s0) I absolutely had to have the Hero Arts July Kit.  My justification was that since I rearranged my clear stamps in Avery Elle folders - as recommended by Jennifer McQuire - I found several gaping holes in my collection including sea creatures.  Hmmmm!   DH didn't buy that either!

Here is the anniversary card for my DD and DSIL; both turtle appreciators.  The card base is 5 inches by 5 inches and I cut an aperture with a hexagon die in the left over embossed paper that I used  for my recent never-ending 50th Wedding Anniversary card.  I backed it with the beautiful pearlised sea green cardstock that came with the kit and stamped the turtles with matching Hero Arts Mermaid ombre ink.  The sentiment comes from a Tim Holtz die and the sequins and hearts also came from the mixture supplied with the kit. 


The inner sentiment and, - not being someone who can waste a die cut - the back of the card!


Love, love, love this kit and can't wait to see August's offering.   Thank you Jennifer, and thank YOU for visiting with me on a beautiful PNW Sunday afternoon.  : ) Christine

Wednesday, July 27, 2016

Never Ending Card for a Special Wedding Anniversary

I haven't felt much like posting on my blog although I have continued to create cards, and boxes and gift holders.  It was just too hard to put my thoughts down. : (   Today, however, is my day on the She's a Sassy Lady blog and I couldn't let that pass without posting the project I had planned to share. 

I love to make Never Ending cards!  They are just so much fun and it seemed to me to be the perfect card for a couple whose love is 'never ending' as they celebrate their 50th Wedding Anniversary.  Quite an achievement, right? 


The card base is six inches by six inches and I used a textured white cardstock.  Over it I layered white embossed pearlised paper and I used shiny gold mirror board paper for the card embellishments and found that it cut beautifully.  The images come from Heritage, Wedding, Stretch Your Imagination,  Designer's Calendar, Wrap It Up, and Phrases.


I created a 'belly band' to keep the card closed and to carry our personal greetings on the back of the tag.  Of course, I had to custom make an envelope as the card would not fit inside a regular 6x6 envelope!


A one of a kind card for a one of a kind couple. : )  You will find many videos on You Tube for this type of card.  Just search for "Never Ending cards"  Many thanks for visiting with me today.   : ) Christine

I need to add an explanatory personal postscript to my post. Like many other Cricut and Gypsy owners, I owe so much to my Sassy friend, Sheila. I would "Grab a cup of coffee" and follow along as she designed and created her wonderful cards.  I began to create my own designs and shared them on this blog.  I was THRILLED when Sheila approved my request to be a Sassy Designer and share my projects on the She's a Sassy Lady blog.  Sheila and her DT were always so kind and so supportive and I hope I was able to reciprocate.  It's so hard to lose a friend, but Sheila's at peace and no longer in pain.  My thoughts and prayers go out to her family and to all in the community of crafters whose lives she touched. Rest in peace.

Monday, July 4, 2016

Celebrate the Fourth!

Happy Fourth of July!  How cute are these Uncle Sam treat containers!


I saved a pin from a SU rep who had made similar boxes using punches, onto my Cricut board since anything a punch can do, the Explore can do more efficiently and in a variety of sizes!  Master J. and I delivered a bunch of them to the OHM shelter for the children.  He told me, a little wistfully, that he liked giving the candy to the children!  Of course, Grandma had extras waiting at home for her DGS and DGDs.   : )


Enjoy your celebrations and stay safe.   Thanks for visiting with me today.   : ) Christine


Wednesday, June 22, 2016

Notes to Self on Using the Anna Griffin Fantastic Flip Card Dies

Sooooo, I did succumb to the lure of Anna Griffin on HSN and have to admit that I enjoyed putting together the cards in the kit in as many different ways as I could think of.  However, I really, really wanted to try out the dies that came with the kit and when I finally acquired the extended platform plates for my Big Shot, I was ready to go.


Here's what I learned:-

*  Close your eyes, grit your teeth and ignore the cracking and popping of the plates as you crank the Big Shot sandwich through.    I understand that it does the same in the Cuttlebug.

*  Anna does not include a die that will cut a frame for the opening.  I mean, really?  Plan A - Searching Design Space, I could not find a frame of the same proportions, even among Anna's carts.  On to Plan B - I folded a 4 by 6 inch piece of cardstock and inserted it at the frame end of the die before cranking it through.  This is what's left over when the frame cut is removed.


Unfortunately, the frame cut in two parts but when glued around the opening, I found that it presented a perfect opportunity for embellishment.


And using patterned paper worked well too.


*  Using double sided paper gives a variety of interesting results.  The embellishments that come in the kit are printed on one side only and to my mind, look ugly and unfinished on the inside of the card.  Using double sided paper with the small embellishment dies results in a nicer look inside.  And, because the cardstock is generally thicker, there isn't the need to strengthen the outer edge of the flip fold. (Since this is the edge that holds the embellishments, it needs all the strength it can get!)


*  The smaller dies work with the Sizzix magnetic plate and are held firmly in place for the second, embossing pass.

*  The quality of the dies is not what I expected from Anna Griffin and I reverted to my good old Heartfelt Creations dies and stamps to embellish this card.


*  The more cards I made, the more frustrated I became with the fact that they will not fold flat.   I did try running the folded card through the Big Shot before embellishment, but it wasn't much better.

You know, I think I'll put the dies in my next garage sale and continue to use the Flip cards on the Artfully Sent cart.  Sigh!  Here's a couple of You Tube videos I found particularly useful:-

https://www.youtube.com/watch?v=k53icPsCzBM&feature=youtu.be

https://www.youtube.com/watch?v=SJqZice8Kqg


Thank you for visiting with me today.   : )  Christine


Monday, June 20, 2016

Happy Father's Day!

Yes, I know that was yesterday, but Father's Day sorta snuck up on me this year and I was in panic mode!   Fortunately, Mary at SVG Cuts came to the rescue with some box cards that really wowed the recipients.  This one was for DH and I enjoyed tremendously making it because the technique is very different.  So, watch the tutorial first and do NOT embellish the inserts until they have been glued in place.  No prizes for guessing why I'm passing on this tip!  Now, would it be possible to make this into a jewelry case or a make-up box?  Hmmmm! 


This box card was for my DSIL, long suffering Dada to Master J. I had a piece left over with this one and still have no idea where it goes!


This one was for my DS,  father of our beautiful, well behaved, and always obedient DGDs!  He is a great BBQ chef.  I used Glossy Accents on the six pack bottles to make them look more authentic.  Then, while they were still wet, I absentmindedly put a piece of paper on top of them!  Oh, well!  Two coats of Glossy Accents are better than one right?


Hoping that everyone had a wonderful day and I have every intention of having cards done by the end of May next year!   Thanks for visiting with me today and please pop back on Wednesday for my blog post for Sheila at She's a Sassy Lady.  I'll be sharing my experiences with the Anna Griffin Fabulous Flip Card dies.  : )  Christine


Tuesday, June 14, 2016

Yellowstone Bears

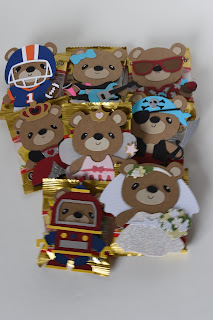
Here's the little project I took with me to Yellowstone - 24 three inch bears from the Teddy Bear Parade cart all cut out and ready for assembly.


My DGDs and I cut this same Pirate Bear a couple of years ago using the Baby Bug.  Let me tell you that using the Explore was a whole different and much easier experience! 

*  All the pieces arrive on the canvas at the same time rather than having to pick out each piece individually to place on the mat 

*DS colors the images so you can see exactly how each one fits together

*Resizing is a one time adjustment.

He is sooo cute!


I attached a small bag of miniature gummi bears behind each one.  I apologize for the out of focus photo.  While C and I were assembling the bears, our DHs were on a Photography Tour of the park and I haven't been able to recover my usual camera settings. : (   


Here's a picture of a (real!) bear he took on the tour.  C and I took a Wildlife Tour later that week and WE saw two yearling grizzlies AND a momma bear with two cubs so we felt that we won the prize for bear sightings!


Thanks for visiting with me today : ) Christine

Thursday, June 9, 2016

Hermoine?

Just two more days before we return home from our camping trip to Yellowstone National Park but yahoo! we have WiFi at the campground here in Twin Falls.
It has been an amazing experience and I have so much admiration for the Park Rangers as they try to balance people's desire to experience all the park has to offer, with their primary charge, the care of the natural wonders and the wildlife.  Sadly, there were a couple of tragedies while we were in the Park.
Today I want to show you a card I made for my DGD who is transitioning from elementary school to middle school in September.
S is a Harry Potter fan and when the Motivation Monday challenge asked for a graduation card using school colors, I immediately thought of this image from Wizard Academy by Pretty Paper Pretty Ribbons.


I was able to reconfigure her arms so that she is holding a wand instead of books.   The sentiment stamps both inside and outside come from Design By Sassy.


Happily, S LOVED her card!   Thanks for visiting with me today.  Back on the road tomorrow : )  Christine
 
Blogger Template By Designer Blogs