Pages

Showing posts with label Christmas. Show all posts

Monday, November 20, 2017

An Attempt at an Eclipse Card

The challenge at BBTB2 a couple of weeks ago was to incorporate a word into the design of your project and I was inspired to try an eclipse card.  Plus, I have so much Christmas designer paper that my storage drawers won't shut and I really need to use some of it up!


The cards I have seen on Pinterest use a short word like 'Noel' or 'Joy' because they are created with steel letter dies and need to be cut in a straight line and have no repeating letters.  However, since I was using my Cricut, I did not have these limits.  I chose to cut 'Ho Ho Ho' and decided to use the Art Deco font.  I simply sliced the words from the 5.25 x 4.0 designer paper rectangle, duplicated the letters in red twice and cut a red 5.5 x 4.25 mat and that's it!


Next I glued the designer paper mat to the red backing mat, then stacked and glued the Ho Ho Ho's together making sure the designer paper was on the top.  I added strips of foam tape to the back of the letters and matching the design, I glued them back in the designer paper mat.  Lastly I added the insides of the O's.


 You can see how the letters are stacked here.  I added a silhouette of Santa and his sleigh from the Christmas cart, and added a Santa from A Quilted Christmas inside.


The stamped sentiment comes from Sunny Studio.  The magic of this card comes as you move it about and the words pop out at you.  Really kinda cool!  Quick and easy too!


Of course, by the time I'd finished playing with my card design, the challenge was over.  : )  Good job there's a new one every week!   Thanks for visiting today.  : )  Christine

Wednesday, December 9, 2015

80 + Santa's Sleigh Treat Boxes - Check!

Fifty or so report cards due to be carried home in little Kindergarten backpacks midway through December meant that I never had time to craft any of the cute treat holders that land in my Pinterest feed.  How I longed to make the Peppermint Patty snowmen or the Santas with candy filled dangling legs for all my Kinders!

When I retired, I began a new tradition - The Great Pre-Christmas Craftathon and this is my third season of treat making for friends, co-workers and the OHM children.   : )  : )  : )  This year I really, really wanted to make a sleigh containing chocolates and candy and here it is!


And here are my Notes To Self on mass production treat crafting with the Explore!

*  Keep the container simple.  There are some beautiful sleigh svgs available with wonderfully ornate runners.  Choose a relatively simple design like the one I used this year from Lori Whitlock.  The runners are glued on the side of the sleigh body rather than supporting it from underneath.  Much easier to mass produce!


*   Choose a design that does not waste paper even though there may be extra construction steps.  Since the sleigh side pieces are separate from the body, I could get 3 small sleighs from one sheet of 12x12 card stock.  Gluing the pieces together was easy and worth the paper I saved.


*  Choose a design that 'ungroups'  in order to save yourself from the work of eliminating pieces by using the 'hide contour' button.  I liked using different patterned paper for the body of the sleigh and this was very easy to do by changing the color on the Design Space canvas.


*  Do not try to cut ALL the pieces at once.  My browser/router/DS/computer configuration does not like me to make more than 9 project copies so I go back and re-cut a mat as many times as needed by clicking on its icon and making 9 at a time.

*  Add embellishments punched from scraps of paper and don't forget the MISTI for stamping the sentiment.


*  When selecting the candy for the treats, include DH's favorite kinds so he'll volunteer to pack the treats for you.  LOL!


Thanks for visiting with me today.  Happy Holiday Crafting everyone!  : )  Christine

Sunday, August 23, 2015

'Minc'ing Christmas

A new box of Anna Griffin Minc goodies arrived in the mail yesterday.  There's foil, glitter paper, extra toner sheets, tons of die cuts, and two toner pens.  Unfortunately, some of the die cuts are not usable because they are badly off center.  : (  Sigh!  I can't decide whether to cancel my auto ship or not.  I guess I'll see how much I can salvage.  I'm hoping to use the pens to 'repair' some of the black patches I sometimes get when foiling.  I'll let you know if that works out or not.

I pulled out my little Minc machine this afternoon and foiled one of the background papers.   Lovely!   Then I was inspired to run the used foil through again over a piece of toner paper to make use of the negative space.  How cool is that!


Next, I tried the glitter paper on the holly leaves.  I ran it through twice and flipped it over between passes.  Look at the leaf in the corner and you'll see that part of the vein line is missing.   I have no idea how that happened but it was probably OE!

Since the puppy was still napping, I tiptoed up to the craft room and assembled this card in about 5 minutes.  Know what?  This is a pretty good card and will work perfectly for several of the non - crafty people on my Christmas list!


Off to play with some more cuts until Katie wakes up and demands to go out.  Shhh!   Thanks for visiting with me today.  : )  Christine

Wednesday, July 8, 2015

Christmas in July

Our immediate family has a brief interlude between birthdays in July and I usually work on a few Christmas cards in anticipation of my great Pre-Holiday scramble!  Normally they get stashed away to be shared later, but this one can't wait!


I've been seeing Pop Out Book Cards all over Pinterest and I was intrigued because the style reminded me of a card I made for the DGDs a couple of years ago.  That one was kinda cobbled together, and I thought it would be nice to have the real template in Design Space.

A search of the web brought me to Diane's blog and she had a scoring and cutting template already to go!  I was able to recreate the template in DS and am just waiting for her permission to share it with you'all. 


I did find a workaround that made it so much easier to position the score lines.  I created a rectangle to match the distance between the score lines.  (For example, if the score lines are 2 inches apart, then my rectangle would be 2 inches wide.)  I was able to move the score line onto the very edge of the rectangle, center the line and the card vertically and attach.  Voila!  The score line was in exactly the right place.


 Here's how the card insert is folded:-


Then it is adhered along the edges to the card base and the folds well creased.


I chose the characters from "Frozen" to decorate my card since I wanted to hang snowflakes from the top of the card.  I used the Print then Cut function and printed them on good quality white card stock.
The snowflakes are punched from glitter card stock and the stars are Martha Stewart glitter stickers and they are both strung on white thread.  This was the hardest part of the whole card!

I used the Darice snowflake embossing folder on all the white mats and glued sequins in the center of the largest snowflakes.  Gotta have some bling!


I think the recipients (shhhhh!) will like the card.  And I look forward to making more Pop Out Book Cards.   Thanks for visiting with me today.  : )  Christine

Friday, December 19, 2014

Duck the Halls

One of the challenges at the Card and Craft club was to create a humorous Christmas card.   I was hoping that my new stamps from Robyn at My Pink Stamper would come in time, but unfortunately there were delays.  Sigh! 

Looking at the Christmas svgs at Little Scraps Of Heaven, I found a 'Duck the Halls' image and remembered this post by Mamamostamps.   Yes!

It was very easy to line up the squares using the x and y axis on Design Space and size the windows from the 'Spring Cottage' cart to match.  I embossed the white mat for added dimension.   The "Merry Christmas" phrase comes from the 'Phrases' cart and I used the Explore to write the sentiment inside. 


I think it turned out kinda cute!    I'm linking my card with the "Anything Goes" challenge at the Fantabulous Cricut Challenge blog.   These are such fun challenges and the variety of entries is amazing.   Check it out here.   

Thanks for visiting with me today.   : )  Christine

Tuesday, December 16, 2014

Christmas Box Card

I can't believe that I've not finished my Christmas cards yet!  Arghhhhh!   Thanks to  SVG Cuts and their box card set, I was able to whip out a few of these fun cards over the weekend. 


I used the 'Merry Christmas Box Card' pattern and added the ornaments from the "Holiday Cakes" cart.  You might recognize the paper as remnants from the Graphic 45 "Twas the Night Before Christmas" stack that I used for my Mistletoe Manor.


This box card is enormous so be prepared for extra postage if you are mailing it! 


I was thrilled to see that the challenge this week at BBTB2 is to use an ornament cut.  Perfect!  I need to get busy pinning the DT's samples for inspiration for next year.  Hop over and take a look.  Thanks for visiting with me today.  : )   Christine

Thursday, December 11, 2014

Tree Treats

Lol!  Try saying that three times as fast as you can!

Have you ever visited Brenda Quintana's blog?   She does the most amazing treat holders for Hershey Kisses and very generously shares tutorials with us.  I've made a couple of the designs but for the December treats for the children at OHM, I went with a simplified version of the Christmas Tree here.    So cute and the perfect little gift!


Master J. tested the kisses for quality control and pronounced that the red ones were best.  Hmmm.    Thanks for visiting with me today!   : ) Christine

Tuesday, December 2, 2014

Santa's Stash

The challenge at the Card and Craft Club in December, is "Old Time Christmas" and the items to be used include paper, a clothes pin, and a paper mustache.  I left it until the last minute.  (Really? LOL!) and all I could come up with was a Santa face on one of the cocoa cups that I have been creating for co-worker gifts.  Actually it turned out kinda cute, but I expect everyone else had the same idea! 

I used the Santa from the Doodlecharms cart, and sacrificed some of the Graphics 45 "Twas the Night Before Christmas" stack for an old fashioned feel to the container.  What is more 'old time' than a Santa who is NOT watching his weight?   Thanks for visiting with me today.  : ) Christine


Friday, November 28, 2014

Cocoa Cup Treats

Hope everyone had a wonderful Thanksgiving!  Unfortunately, we didn't get to see ALL our family, this year but Master J. certainly kept us busy!  You just can't tell a 2 year old to sit and salivate at the delicious turkey aroma for 30 more minutes.  He wants dinner now!

Well, it's time to pack away the cornucopia, gourds, garlands of leaves and the Thanksgiving Cabin and put up the tree and the Mistletoe Manor.  (Although with the release of the new Frozen cart, I was thinking it might be fun to make a 3D Elsa's castle decorated for Christmas with all the characters skating around it.   What do you'all think?)

I have been working on the treats I love to make for my family to hand out to co-workers and friends and this year, I adapted the cocoa cup file from Lori Whitlock and filled it with my favorite Ghiradelli  chocolates.  The paper comes from Martha Stewart and the sentiment from CTMH Artbooking.  The snowflake flourish comes from Theresa Collins' December 25th cart and I cut it from DCWV Glitzy Glitter paper on the Intricate Cuts setting. It's gorgeous!


I am going to link my treat containers to the Decorate to Celebrate challenge # 89 Anything Goes!   This is one of my favorite sites to browse for inspiration.  Check it out!

Thanks for visiting with me!  Time to get on the road and deliver Master J back to his parents - who moved from their apartment to a house today!  : ) Christine

Wednesday, November 19, 2014

Mistletoe Manor

I have SO enjoyed seeing all the versions of the Mistletoe Manor on Pinterest and on the SVG Cuts Facebook page.  Mary gave us an amazing pattern file and set us free to adorn it in as many ways as we could think of!  But, the magic happens when you add lights to the house and a photograph just does not do it justice.  (So you will have to come see it for yourself, Sister!)  Love it, love it, love it!

I, um, mentioned that I made a big mistake when I was making it and, unfortunately, I made another mistake yesterday when I let my 2 year old DGS see it lit up!   However, a little extra glue and you can't even see where the repairs were needed!   I have to say his reaction was lovely to see!

So my first mistake -  I adhered the base pieces together in the wrong order and then glued the house down.  Oooops!  When I came to add the pillars - there was nowhere to put them!  A creative repair was needed and a good coating of texture paste and fake snow plus glitter covered everything up.   : )


Here's my version of the Mistletoe Manor: -


 I used Graphics 45 "Twas the Night Before Christmas" stack and Bazzil paper to make the house sturdy.  It was such a fun project!

Thanks for visiting with me today and allowing me to share my Mistletoe Manor.  : )   Christine

Monday, December 30, 2013

A Christmas 'Thank You!' Card

I have a scrapbooking friend who creates wonderful layouts!  Last Summer she helped me with some of the pages that I did for S and G, and on Christmas Day,  I opened up a wonderful package stuffed with crafting goodies that she had mailed to me.  Yeah!

Here's the 'Thank You!' card I made this morning for my friend. (I've had this idea in my head for a patchwork stocking for months. Thank goodness it is now out and I can get on with other stuff! KWIM?)

The stocking shape is from Echo Park in the Silhouette store.  I could have used any of the Cricut Christmas carts but I find it easier to duplicate, align and weld with the Cameo software and I needed to make the top of the stocking open up to add my sentiment. Hope you can stand one more hexagon card!

Thanks for visiting with me today!  : ) Christine


Tuesday, December 17, 2013

Home(work) for the Holidays

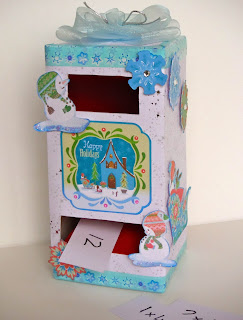
Most of the family got together last weekend to celebrate DH's birthday.  Such fun!  The DGDs had just received their first trimester report cards and we were asking, as Grandparents MUST do, how they had progressed.  S confessed that she had been asked to master her multiplication facts through 4 over the holidays.  Poor S!  Everyone tried to help by springing multiplication questions on her at random moments!

Later that evening, I remembered the 'Flip Chute' that I had made 100 years ago when student teaching and how that had made the memorization process a fun game.  DH did his part by finishing off the carton of chocolate milk and after it was washed and dried, I added the card stock chutes inside and covered the outside with DCWV paper.  To make it seasonally appropriate, I used my Imagine and the Snow Angel cart to decorate the outside.  I finished off with plenty of Stickles and bling! 

If you haven't ever seen one of these before, you read off the question and post the card in the top slot.  You must answer the question before the card flips and presents the answer through the lower slot.  Very cute!   Is your mind racing with possibilities?  Parts of speech, states and their capitals, historical dates?  LOL!   

I am linking my Flip Chute up with the challenge at

Exploring Cricut . " It's Beginning to look a lot like Christmas "


and the

FCCB Challenge #191 Anything but a Card, Holiday Ed.

 Thanks for visiting with me today!  : ) Christine


Sunday, December 8, 2013

Brrrr!

Here in the PNW we are trying, like the rest of the country, to keep warm! I did tear myself away from the wood stove this afternoon to make another attempt at a floating easel card using my E.  ( I just LOVE this design by Karen B. at Sizzix but don't have the necessary dies to create a card the 'official' way!)

I had in mind this week's challenge at Cardz TV and the cold, cold, weather reminded me of a time long ago when we lived in Northern Alberta.  In winter, the Fire Dept. constructed a skating rink on a vacant lot close to our house and flooded it.  Every day after school it was filled with children practicing figure skating, playing skate tag, and having a glorious time.  Later, the ice hockey players would take over the rink and we'd hear the thud of the puck hitting the boards until late at night. 

This ice skater cut from Winter Woodland is a favorite of mine. Her dress is a scrap of my precious Theresa Collins paper flocked to resemble the furry outfits of the little girls in their 'tippy toe' skates.  I flocked and sparkled the tree too. 

I am HOPING Santa brings me a lightbox this year so that I can get some reasonable pictures of my stuff!  So, once again, my apologies for the quality of the photos.  I could NOT get a picture that didn't show the snowflake lines!  You can hardly see them in real life.   Aghhh!  Thanks for visiting with me today.  Stay warm!  : ) Christine


Cardz TV Go-To Galz Linky Party Challenge #9 

“Winter Wonderland"  

Create a card, layout or craft with a Winter scene.


Wednesday, December 4, 2013

So much for crafting plans!

Since the painters were painting the upstairs hallway as well as the great room, it was all taped and papered and covered in plastic and drop cloths!  No craft room access!   Aghhhh!  I spent the whole day watching "Downton Abbey' and trying to keep Cocoa from 'supervising' the painting process! 

Day 2,  I was prepared with a project prepped and ready on the kitchen table before the long suffering painters arrived to re-tape etc!  (Cocoa and Sam were banished outdoors since the sun was shining.)

This lollipop holder die came from My Creative Time, and is one of my favorite treat holders.  I have used it for Valentine's Day, Hanukkah, Halloween, July 4th, baby showers, to name a few occasions.  I have used it to hold mini bottles of hand sanitizer and hand cream, and stacks of mini chocolate bars, as well as various kinds of lollipops.  Pinterest has tons of ideas for decorating the holders.

Anyway, I made dozens of them yesterday as table decorations for a party.  They're not really blingy or sparkly as per request.  Gonna make some super fantastically sparkly ones as place name cards for my Christmas table as a reward for being so restrained!  LOL!

Thanks for visiting with me today.  : ) Christine


Sunday, December 1, 2013

What's a girl to do...

when DH announces that it is time to send out the Christmas cards to friends and family overseas and the resident card crafter is still making THANKSGIVING cards?  Why, run right over to SVG cuts and download their Merry and Bright files!

I love this first one because it uses scraps and like everyone else, I have boxes of scraps!  I added glittery tulle and sequins since I thought this design had a 'quilt' feel to it.

The 'JOY' shaped card came together quite quickly and is easy to mass produce although since I am quite incapable of making two cards exactly alike, embellishing took a little extra time.

The painters are coming in tomorrow, so I will be staying out of the way and crafting in my room.  What a sacrifice!  LOL!   Thanks for visiting with me today.  : )  Christine


Wednesday, November 27, 2013

Sparkle and Bling!

I had a lovely day yesterday!  I was invited back to school to help with some math testing for the end of the first trimester.  It was wonderful to see everyone and to get to know the new Kinders.
Lovely as that was, I was happy to leave at the end of the day knowing that I was free to play in my craft room.  No grading!  No lesson plans!  No Report Cards!

Here's what I was playing with - Christmas treat boxes sparkling and shining all ready for the latest challenge at the Fantabulous Cricut Challenge Blog!

                      Challenge #188: Sparkle and Bling

   I used Anna Griffin's Winter Wonderland cart to create the snowflake and poinsettia.  I do love the DCWV foil papers and their Glitzy Glitter line.  Can you see that I used my new TH Distress Glitter in the center of the poinsettia? I backed the embellies with glittery tulle from the Bridal aisle at J's and added some bling to the center of the snowflake.  Can't get much sparkly or blingy than that, right?  LOL!

Happy Thanksgiving!   Happy Thanksgivukkah!  And thanks for visiting with me today.  : ) Christine


Sunday, November 24, 2013

The first card of Christmas...

is quite nostalgic!  I made several 'quilt' cards way back before I bought my first Cricut but could NEVER get the pieces to fit together nicely.  I was reminded of this technique by Mary at CardzTV and as I have a friend or two who quilt, I resolved to try to make a Christmas quilt card.  

The idea of a button and thread on the center square is totally scraplifted from Mary and was a much nicer (and easier) embellishment than the faux stitching and knots I used to do.   I added a holly sprig from Winter Wonderland as this seems to be my favorite die cut this year and I have quite a few made up ahead of time. (They are easily put together when the resident football fan has possession of the TV remote!)

Thank you for visiting with me today : ) Christine


Friday, November 15, 2013

Hershey Nugget Holiday Treats

I am LOVING this DCWV Holiday Glitzy Glitter stack!  It cuts wonderfully - just look at the camels' tails and blankets - and doesn't spread loose glitter inside my E, on the floor, over my desk and on my clothes!   Loving it!

These are the December treats for the OHM.  Mary at CARDZ TV made Halloween treats by stamping on address labels and wrapping them around Hershey Nuggets.  I had to try it, and then demonstrate to DH who thought that I had unwrapped and re-wrapped the nuggets and was a little dubious about taking them to the shelter!

Forgive the pictures!   It is a dark and dreary PNW day outside and I was endeavouring to show you the paper's lovely sparkle and shine.  The treat topper is from Elegant Edges and the cuts come from Inspired Heart. 

I am entering my treats in the Hiding in My Craftroom challenge using die cuts.  Pop over to see all the fun creations at

http://www.hidinginmycraftroom.com

 HIMCR #124 - Die Cuts

Thanks for visiting with me today!  : ) Christine


Blogger Template By Designer Blogs