Pages

Sunday, July 10, 2022

A few cards to add to the stash

 I made three cards last week.  This for me is amazingly productive!   You see, I always thought that I had to block out a couple of hours at a time for crafting and nowadays - elderly dogs, elderly DH, elderly crafter - this never seems to happen.  However, a couple of weeks ago, Covid caught up with us and while the blocks of time were there, fatigue made it impossible to craft for longer than a few minutes!  I learned to leave the mess on my desk and create in short bursts.  Well, duh!    Here are the cards I made to replenish my stash: -
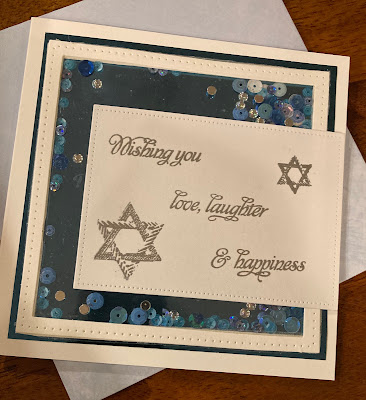


Stamps - Hero Arts 

Inks - Uncharted Mariner, Salty Ocean, Wilted Violet

Bling - Sunny Studio 

Stencil - Vicki Boudin

This card is easy and so versatile.  I write inside "Hope your (vacation/birthday/visit/day etc) is fintastic! "


Stamps - Hero Arts

Inks - Mowed Lawn, Peeled Paint, Ground Espresso, Rusty Hinge, Wilted Violet

Stencil - Hero Arts

I did not like the stenciled background as it was just so overwhelming so I cut it up into smaller squares and now I think the card is too busy!  In the stash it goes!


I did enjoy stenciling these balloons despite the many, pieces of masking tape I had to use to keep the card panel free from stray bits of ink!


Stamp - Hero Arts

Inks - Candied Apple, Saltwater Taffy, Scattered Straw, Spiced Marmalade.

Stencil - Paper Rose

Bling - Sunny Studio


Well, let's see if the micro burst crafting streak continues!  Have a great week : )  Christine

Saturday, February 12, 2022

Another Covid Christmas (and Hanukkah!)

 Remembering our second Covid Holiday Season!  First the Hanukkah card which I intended to be a flat shaker card, but I did NOT like it and so it morphed into a regular shaker card!


Stamps are from Kitchen Sink.

Nowadays, I find that making multiples of a card is therapeutic.  I get lost in the process rather than worrying about the design.  So here are my Christmas cards and I relished all the techniques involved - stamping, foiling, stenciling, die cutting, embossing...   Such fun!


 From the Spellbinders' collection.   This one was DH's favorite because, "It looks like a Christmas card should."   Another from the Spellbinders' collection:-


I did add a layer at the back of the ornaments using one of my circle dies.


These dies have an entirely different look when I used other colors like pink and red with a white glitter top layer or monochromatic gold layers on a black background.   Then I had to make some cards with a Tim Holtz die set:-


I intentionally placed the panel to one side so that the greenery spilled out onto the frame.  I should have added an extra branch on this one!   I struggled with the image since the lantern is dimensional and the candle is not.   It is what it is.   Moving on to my last card and I only made two of these:-


Loved painting the poinsettia and the scripty greeting.   

We had a white Christmas here at the beach and were housebound because of the icy roads.  We had some family with us so that was extra, extra fun but we missed all getting together and set an extra place at the table for our missing loved ones.   We do so appreciate our supportive family.    Christine : )

Sunday, October 31, 2021

Halloween 2021

 Well. it's been a while since I posted, but I have been escaping to the world of card making and crafting every chance I get - just haven't felt like sharing since my Number 1 Fan, my sister, passed away.  But,  here I am and it's Halloween 2021.  


Yes, I HAD to have the Tim Holtz Moon Masks!  Of course I did : )   I used Distress Oxides for the background and added one of the witches from Toil and Trouble on her broomstick.  Love the spookiness of this card.


This is the second card I made using the Toil and Trouble die set.  I stamped and embossed Floral Outlines before getting inky with various Distress Oxides.  The die cuts are from black glitter paper and I cut off the legs of the broomstick flying witch and reattached them so that she could stand over the cauldron.   


Although I had firmly decided never to buy another Colorize set, I could not resist these little characters from the Costume Party die set.  (The genius of the Cricut die cuts lies in their initial shadow layer which enables you to piece all the subsequent layers in order.  TH and the Sizzix folks seem to have figured this out and these were much easier to build.  Plus, there are great little Colorize videos to help with the placement : ) )   This little monster is on an action wobble.  I love him!


 My last card, for my youngest DGD, is from the Costume Party die set, and is also on an action wobble. This little mummy is so much fun!   I even remembered to run the flaps of the envelopes of my cards through the Big Shot using an ancient Cuttlebug embossing folder.  Yes!


Thank you for visiting today.  Happy Halloween!   Love you and miss you, Number 1 Fan!     : ) Christine 

Wednesday, January 13, 2021

Sending Hope...

Our family was so happy to say goodbye to 2020!   We were hoping that 2021 would bring everyone much happiness but so far, not so much!    Even the weather has been atrocious and we've had flooding, landslides and beach erosion.   We happened to arrive for our usual morning walk on the beach on Sunday just before high tide and although we did not get our walk, we were treated to some absolutely amazing and awesome wave action.  A little silver lining there!   

Hero Arts included a wonderful two piece die set in the latest monthly kit and because I find paper piecing so relaxing and such fun, I used the die on four different floral backgrounds intending to recreate the word Hope by gluing in the colored pieces.  I was able to make four cards with the four cuts.  


And yes, there is one purple piece in there because I lost the green one I planned on putting there!    I transferred the die pieces onto an old, well used, Cricut mat that I had cut into four pieces, after running them through my Vagabond but still managed to lose 3 little pieces!   


Background: Distress Oxides, Speckled Egg, Broken China and Blueprint Sketch 

Sentiment stamps: Hero Arts, Sunny Studio


The innies:


And then as I was clearing my workspace, I noticed that I had put one of the die cut negative spaces on a piece of iridescent paper left over from another project and voila!   There were four more cards begging to be made!  


And inside:


'Hope' the recipients like their cards as much as I enjoyed making them.   Stay safe, stay healthy and stay dry!   : )  Christine

Thursday, December 24, 2020

And the rest of the Christmas cards...

 Minus the baking, and freezing, and shopping, and thorough cleaning that usually presages the Christmas season, I had lots of time for card making.  I was so happy to be able to send home made cards to friends and family this year, but of course, I missed terribly the usual pre holiday rituals.  (Well, maybe not the cleaning!)   

How could I resist this Lawn Fawn stamp set?  I used the wreath builder from Gina K to stamp the bubble wreath and then fussy cut and pop dotted the stamped and colored images.


Inside:-


Last year I bought this Tim Holtz snow globe set of dies but didn't have time to play with it.  There are 23 dies in this set!  


Inside:-


Sunny Studio sentiment.


This year's Tim Holtz purchase - Sketch Greenery.  Love the versatility of these stamps.  I got lots of practice with the Misti and masked the holly so that it would sit on top of the rest of the greenery.   The wood grain stamp comes from LaLa Land.  The TH deckle edger is an early present to myself!


Inside:-


Sunny Studio and again with the snowflakes!!!!!!


Here's a spectacular pop up card from Dreaming Tree.  This mechanism is awesome and easily adaptable for many images from Cricut Design Space.


Although I do not like that little edge of the presents showing under the 'snow.'  Wonder how to prevent that edge from showing without interfering with the mechanism?  Hmmm!    


All that remains is to hope you have a very Happy Christmas despite the restraints and disasters.  I wish you all the very best for 2021!   : )  Christine

Monday, December 21, 2020

Another Hero Arts Card for Christmas

 I ordered an 'add-on' with last month's Hero Arts monthly kit - the Etched Winter Scene, and followed the HA directions for its use rather than loading it in my Misti.   It was an interesting technique and I got almost perfect results every time.  I was inspired by this card, but used silver embossing powder for my card.  (I had to justify my purchase of a new heat gun!)   I also discovered that after activating the embossing powder, I could use an embossing pen to touch up the image.  Plus, I was able to embellish the worst areas with the snowflakes!  


Inside:


The little tree is amazing and looks almost like metal.  Sentiment is from Sunny Studio stamped with navy Hero Arts ink.


This was a fun and easy card to make!   Thanks for visiting : )  Christine

Monday, December 14, 2020

Hero Arts - November Kit

 I treated myself - we all need a treat now and then - to a subscription to the Hero Arts Kit of the Month and I am loving all the bits and pieces that come in the kit!   The November kit is perfect for hand crafted Christmas cards and I just had to CASE this slimline card from delandartie.com.


I simplified card and added snowflakes instead of dabs of snow.  The 'Peace on Earth' sentiment is included in the kit.  

The innies:-


Sentiment - Sunny Studio


My favorite card so far...   : )  Christine

Wednesday, December 9, 2020

Hanukkah + Cricut Foil + Slimline Card

 When you have new 'toys' just begging to be played with...


and a Hanukkah card that needs to have been mailed YESTERDAY!  Then...


You find images in DS that can be foiled,  use the new slimline dies on silver card stock,  glue, glue, glue, take awful pictures because you have only 25 minutes to get to the Post Office, address the envelope and add a stamp without noticing that it's one of the new Santa Claus Christmas stamps (Ooops!)  and get the card in the mail with seconds to spare.


Actually, the card is very pretty and it looks like I spent a lot more time on it than I actually did.  Shhhh! 

Happy Hanukkah!   : )  Christine 

Tuesday, November 24, 2020

Have a Safe and Happy Thanksgiving

When I mentioned to my DD that we would probably not be able to invite her family to our Thanksgiving dinner this year, her first reaction was disappointment and her second, an instant later, was joy in anticipation of cooking her own turkey and getting to eat, "all those yummy leftovers!"   There's the silver lining!   It IS going to be a different holiday season this year, but we'll just keep looking for those silver linings and make it the best we can.  Right?


Last year I made these cute matchbook treat holders for everyone.   They contain a Ghirardelli treat and the sentiment "Gobble til you wobble!"   The turkey, naturally, is on a wobble spring and I loved everyone's reaction to the wobbly turkey!  


This year, I had to return to card sending for the holiday and here, after many changes, is my final version:


Designer paper from Carta Bella 'Hello Autumn'

Sunny Studio Pretty Pumpkins stamps and dies

Sunny Studio mat Frilly Frames Lattice

Sunny Studio sentiment from Bountiful Autumn embossed with gold Stampendous embossing powder.


Inside:


Sentiment from Design Space plus text - Folk Art Festival


Version 1 - Distress Oxides for a subtler look on the bolder paper.

Version 2 - Distress Ink for a darker, bolder look on the lighter paper.

Time to clean up the chaos and start on some Christmas cards.    Happy Thanksgiving!   : )  Christine

Thursday, October 29, 2020

Halloween - 2020


 My DDs, bless their little hearts, spend precious time finding birthday cards for me that will make me say, "Oooh!  I can do that!" The cards are a double pleasure and I love each one and add it to my 'Inspiration" folder.    So, when a friend sent me a delightful, delightful little mini accordion book, I was inspired to try one of my own using my Cricut.  How cute is this?


The 'book' is 1.5 inches by 1.5 inches and here is the front and the back:


And another look at the inside.


It was such fun to make in Design Space and I have a Christmas 'book' all ready to cut. (Of course!)


Here's the inspiration from Pam:


Cutest thing ever!   Have you ever seen one of these before?    Love it!   


Here are some other cards I made:


CASE from Sunny Studio and:


I got inky with my Hero Arts kit!      Have a spooky fun time on Saturday but stay safe.   : )  Christine

Wednesday, October 14, 2020

Trying Out the Cricut Foil Transfer Tool

 Being obsessed with foiling, how could I NOT push the buy button for the new Cricut Foil Transfer Kit?  And, so far, it has not disappointed me.  : )   It is easier to use than the Foil Quill since there's no waiting for the tip to heat up and the mat partially ejects before cutting so that you can remove the foil.  You can even use different colors of foil on the same project - think green holly leaves and red berries!  Here are the first two cards I made:


The ginkgo leaf image comes from Design Space and I used the Beadwork writing font which is free with Access.  


Love the gold foil!  However, I attached the sentiment to the image and the Cricut told me to take off the foil and add a new piece to write the sentiment.  I was confused since I knew I had left enough space to foil both parts of the card.  But, I did what I was told and moved the foil over and re-taped.  Well, no.  I did not move it far enough as you can see, the 'T' and the 'h' did not foil properly and there is a scratch under the 'n'.


With my second card, I ignored the request to remove the foil and just sent it back through.  Yes!


Matting the pearlescent paper with foil card stock seemed to make the foiled images 'pop.'   I also noticed that the Maker did not know which size tip was in the clamp, nor did it warn me when I forgot to replace the foiling tool with the cutting tool.  It just debossed the card stock instead of cutting it.  (Filing away that fact for use later!)  

Both cards were simple to make but very pretty.  Now, of course, I need more Cricut foil!!!!   But in the meantime, back to Halloween projects ; )    Stay safe!  Christine

 
Blogger Template By Designer Blogs