Pages

Wednesday, October 14, 2020

Trying Out the Cricut Foil Transfer Tool

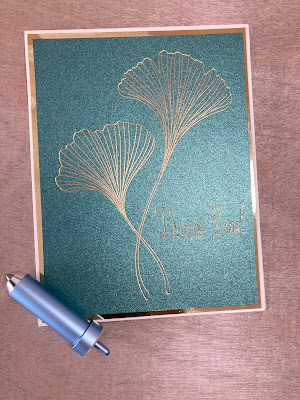
 Being obsessed with foiling, how could I NOT push the buy button for the new Cricut Foil Transfer Kit?  And, so far, it has not disappointed me.  : )   It is easier to use than the Foil Quill since there's no waiting for the tip to heat up and the mat partially ejects before cutting so that you can remove the foil.  You can even use different colors of foil on the same project - think green holly leaves and red berries!  Here are the first two cards I made:


The ginkgo leaf image comes from Design Space and I used the Beadwork writing font which is free with Access.  


Love the gold foil!  However, I attached the sentiment to the image and the Cricut told me to take off the foil and add a new piece to write the sentiment.  I was confused since I knew I had left enough space to foil both parts of the card.  But, I did what I was told and moved the foil over and re-taped.  Well, no.  I did not move it far enough as you can see, the 'T' and the 'h' did not foil properly and there is a scratch under the 'n'.


With my second card, I ignored the request to remove the foil and just sent it back through.  Yes!


Matting the pearlescent paper with foil card stock seemed to make the foiled images 'pop.'   I also noticed that the Maker did not know which size tip was in the clamp, nor did it warn me when I forgot to replace the foiling tool with the cutting tool.  It just debossed the card stock instead of cutting it.  (Filing away that fact for use later!)  

Both cards were simple to make but very pretty.  Now, of course, I need more Cricut foil!!!!   But in the meantime, back to Halloween projects ; )    Stay safe!  Christine

Thursday, September 24, 2020

The Colors of Fall

 I have had a set of Spellbinders Shapeabilities Fall Foliage dies for EVER and use them only rarely because I do not like how solidly monochromatic they look when cut from card stock.   I pulled them out while looking for something to use with my Crackling Campfire Distress Oxide and duh! why did I not think of inking them before?????  I had the most fun getting inky and experimenting with a little of this color and a smidge of that with no clear idea what I was going to do with the finished leaves.  


Then I noticed the scrap paper I had been using under the maple leaves and loved, loved, loved how CCDO looked when layered over randomly placed leaves.   So, I did this - intentionally!


You cannot mess this up!   It looks amazing every time. (Well, I think so!)  I cut the background paper up and found a new-to-me card technique (from Splitcoast Stampers) called a spanner card.  (Pinterest tried to insist that I meant 'spinner card' but it really is called a spanner card!)   So easy to do and lots of hidden areas to decorate. 


 And, since it stands up like a regular card, there's no need for the complicated instructions I have to include with easel and bend cards.  So many ideas...   Please stay safe!  : ) Christine


Friday, September 11, 2020

Falling Leaves

 I keep seeing posts about "crisp Autumn days" and my goodness, I am absolutely longing for those days to arrive here in the PNW!   Last week we had unprecedented heat, high winds and now, a thick blanket of smoke.  There's no danger here, but we have family and friends ready to leave if necessary and head north.

I pulled out my Autumn collection of stamps and found the Tim Holtz 'Falling Leaves' set I bought last year.  Aha!  However, by the time I smooshed, and blended and brushed oxide backgrounds and stamped the skeleton leaves, they did not look in the least "crisp" but I liked them anyway!  


My very first slimline card and I love how much room there is to fill!  I stamped and fussy cut 21 leaves and no two are alike. : ) 


Innies: -


Stitched squares  -  Elizabeth Craft Matting Squares

Sentiment stamps - Sunny Studio

Slimline card mat - Sunny Studio


So much fun and a complete distraction from whatever 2020 keeps throwing at us!  Stay safe  : ) Christine


Tuesday, September 1, 2020

Summer Card

When it's time to send cards and your mojo is focused on last year's Project Life then it's Dreaming Tree to the rescue!   This is the Summer card from their Seasons All Occasions Cards.


Note to self : minus the yellow layer because if one is using gold mirror board, flaunt it!


Not a bad message for this trying year!      : )  Christine

Tuesday, August 18, 2020

Front Panel Step Box Card!

So, I pinned this card forever ago with the idea that I would try it for my sister's birthday.  I like the way it stands up straight and has lots of areas to showcase beautiful paper.  It was fun to make and I enjoyed reading the directions which took me right back to my childhood in England.  I had forgotten that the verb 'stick' translates to 'glue' as in, "Stick the designer paper to the card base."  : )


Here's the card:


I used Graphic 45 paper, Cheerful Daisies stamps from Sunny Studio, and a Tim Holtz die for the sentiment.


And the back -


Love that Graphic 45!       This is my practice card -


made from a Hobby Lobby paper pad.  I like this one too even if it was just to figure out how the construction works.


Note to self  -  remember to keep the embellishments within the confines of the 4.25x 5.5 card base.  I'm thinking of a haunted house on the front panel with ghosts popping up behind, and a full moon and bats on the back panel.   Spooky!     Happy, happy birthday Janty!   Miss you, stay safe, hope to see you soon and then we can PARTY!       : )

Friday, July 31, 2020

Still Masking!

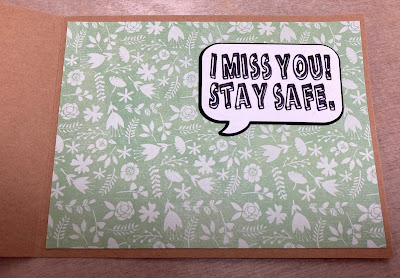
The challenge over at BBTB2 is Cute Critters and since we plucked up courage to leave the safety of our home and go camping, I am very late in posting my entry.   We did enjoy being in our little RV, and seeing friends for the first time in forever, but gathering around a campfire in the evening, all wearing masks and socially distanced just wasn't the same!    The dogs, of course, had no problem circulating and accepting treats or cuddles from everyone.  : )  


Beaver and Squirrel -  Create a Critter
Speech bubble - #M46AC7
Face Mask - #M16706579  and I did a little work with the contour button to make a solid mask.
Distress Oxides - Speckled Egg, Faded Jeans, Shabby Shutters and Forest Moss.
Grass stamp - Sunny Studio


Inside:-


Font is Alphabet Soup


One more critter on the back:-


Mouse - Create a Critter
Mask - #M16706579           

Soooo cute!  After my initial foray into mask making, we bought a box of 50 disposables from a local store.  Whoever could imagine that I would go through that box and have to replace it?   I miss your face!       
Hop on over to Bitten By The Bug and check out the other wonderful entries.   Stay safe!   : )   Christine

Saturday, July 18, 2020

An Incire Anniversary Card

My DD's 10th wedding anniversary is coming up at the end of this month and I searched in vain through Pinterest, Design Space Projects, and all my favorite SVG stores.   Nah!  Nothing inspired me.  Does that happen to you?   The solution for me, is to stop thinking - DH would say 'overthinking' - and go work on the card that is bubbling away in the back of my mind.  What I wanted to do was make another incire card.  I pulled up the Lori Whitlock file and there was my solution!


First, I used the contour button to eliminate the center cuts and folds.  Then, after the card was cut, I inked the inside with Candied Apple and Worn Lipstick.  I used the same Distress Oxides to ink the insert which I also cut in white card stock.  


How cool is that?   Oh the possibilities!


The inside: - 


Next time I'll be more careful with the inking.  And, I did straighten out the bent corner.    Wonder what it would look like with white patterned paper?   Hmmm.    : )  Christine      Stay safe.
 
Blogger Template By Designer Blogs