Pages

Wednesday, May 21, 2014

Ice Princess

Look what I've been doing... crafting for my DGD's birthday at the end of the month.  Can you guess the name of her favorite movie? LOL!  I've just got the drink wrappers to finish and plan on getting the girls to help me out when they stay over on Saturday.


The card-in-a-box file comes from SVGCuts and is super simple to construct.  There's a video available on the SVGCuts website.  

The Ice Princesses and Happy Snowman come from Miss Kate's Cuttables here.


The gift bag features the castle from Once Upon A Princess, the snowflakes are from A Child's Year and my favorite tag shape is from Art Philosophy.  Everything was cut on my Explore and the only problems I encountered came from the new, over-sticky mats that I used!


I am linking my gift bag to swell the entries at the Gift Wrapping Challenge over at BBTB2!  The DT's creations are truly inspiring. Check it out!

Thanks for visiting with me today.  : ) Christine

Wednesday, May 14, 2014

Hanging Herbs!

Just a quick post to share with you the hanging herb gardens I made for DD and DDIL for Mother's Day.  I bought the chicken wire message centers from Craft Warehouse, removed the clothes pins and string - which as far as I was concerned was attached to the wrong side of the wire to start with!  DH and I added a stronger wire to hold the 3 inch pots in place.  (I WISH I could have found nicer pots to replace the original plastic ones!)

The top is covered in chalkboard vinyl and 'Herbs' is also cut from vinyl.  The font comes from Nursery Rhymes and is one of my favorite fonts.  It always cuts beautifully and is ornate but readable!

We are having beautiful weather this week so I have been able to get out in the garden to tend my own herbs. : ) Thanks for visiting with me today!   Christine


Saturday, May 10, 2014

Another Never -Ending Card!

While the rest of the card-making world is totally engrossed in making wonderful Cards - in - a - Box,  I am fixated on the Never - Ending card!  Ah well!  I'll probably catch up by Christmas.

I love how the Graphic45 stacks enhance this kind of card and the pages are SO pretty, that they need no embellishment, except perhaps a smidge of ink around the edges.

My second Mother's Day card is from the Secret Garden stack.  I added a tiny rose and some ribbon to the stamped tag.  (The tag is the only Cricut cut on the card!!!!!)

I finished the card just in time to link with the Exploring Cricut and More Mother's Day challenge here.

Thanks for visiting with me on this rainy Saturday!  : ) Christine


Friday, May 9, 2014

Mother's Day Card

Here's the first of my Mother's Day cards.  I usually make two - one for my DD and one for my DDIL.  (I will buy a posy of flowers for DD # 2 in memory of our angel GC)

The family traditionally has brunch at DH's Golf Club and the DGDs salivate over the menu in the weeks prior to the occasion and make plans to eat all their favorites.  Lovely!

I tried my hand at a trifold shutter card at Christmas following a pattern from SVGCuts.  This time I imported the file into Design Space and used the Explore to cut the pieces.  The roses were cut from Art Nouveau and the sentiment  phrase comes from Florals Embellished.  I used the Explore to write the outline of the phrase and then colored it in with glitter pens. The paper is from Graphic 45, of course.

The challenge over at BBTB2 this week is... Mother's Day!

I am also linking my card with Challenge Number 210 at FCCB.

To all you Moms, Grandmas and Aunties out there -  Happy Mother's Day!

Thanks for visiting with me today.  : ) Christine


Tuesday, May 6, 2014

Never Ending Card

I have had this Lori Whitlock svg for a never ending card for ages and every time I opened it up, it looked too complicated to mess with.  On Saturday, National Scrapbooking Day, I was determined to just do it!

I cut out the card with scrap paper and after watching Lori's Youtube video, I was able to put it together.  Sooooo cool! 

O. K. Time for the real thing - a card for my DS's birthday.  I abandoned the svg and using Lori's measurements, I cut the card using my paper trimmer since I needed to use specific images to decorate the card.  To save time, I cut a square mask, placed it on the Good Ol' Sports papers, drew round the inside and cut it out!   Easy peasy.

 I decided to cut a band to hold the card together and added a label from Preserves and the sentiment 'Happy Birthday' from Wild Card 2.  There are so many layers and such dimension to this cut that it looks like chipboard when it's all put together.  I'll be using this image again!

The challenge at     FCCB
this week is to use patterned paper. All wight!  (As Master J is wont to say!)  Thanks for visiting with me today.  And try a never ending card yourself!  : ) Christine


Monday, May 5, 2014

Birthday Card for an 'Outdoor Man!'

Saturday was National Scrapbooking Day and I spent most of the day 'playing' in my Craft Room, browsing the 'net and visiting Craft Warehouse.  A perfect 'me' day!
My Cricut Circle sisters coordinated 2 days of challenges, tutorials and sharing and fun!  I learned so, so, much.

One of the first challenges was to make a project for a guy and you can see Diane's fabulous wallet mini here.

Awe inspiring and jaw dropping!  I love this Good Ol' Sports Graphic 45 stack and have a project to share with you later,  made with this paper pack.

I was able to combine this challenge with a project that was on my to - do list and again the card was inspired by one on Pinterest that used Stampin' Up products.  I used 'Animal Antics' for the background scene but replaced the trees with less cartoonish, more realistic cuts.  The elk and wolf come from 'Outdoor Man.'

This was a fun card to make and the BEST part was that when DH saw it he asked me to make one exactly like it for his friend's birthday in June.  He specified the exact same colors and papers.  Aghhh!  My hope is that he won't remember the exact same colors and papers by the time June rolls around and I can tweak it a little!

Happy Birthday, Jon!  Thanks for visiting with me today.  : )  Christine


Wednesday, April 30, 2014

Cinco de Mayo Pinata Treats

Where did April go?  Here in my little corner of the PNW,  April seemed to be a continuation of Winter with cool temperatures and lots of rain.  Yesterday, with May right around the corner, the Clerk of the Weather assigned us a glorious 75 degree day!   We celebrated by taking Cocoa and Sam walking on the dyke trail and then consuming a Hagen Daz ice cream in the Bi Mart parking lot.  Yeah!

May means lots of birthdays, Mother's Day, National Scrapbooking Day, and ... the next set of treats for the OHM children.  I chose this fun little pinata cut from Ole and cut it twice.  My on - line friend,  Scrapalette, from the Cricut MB taught us how to make any cut into a container by adding a U shaped strip between the two cuts.  Easy peasy lemon squeezy! (Thanks, Scrapalette!)   I added mini Kit Kats to the pinatas.  So cute, quick and easy!   Thanks for visiting with me today. : ) Christine


Saturday, April 26, 2014

Baby Boy Card

I have been extra - specially busy with Grandma duties!  How wonderful is that? One of the great features of Design Space is that I can play around with lots of images and design projects with one eye on a sleeping Master J. or on 2 busily playing young ladies!  So I have plenty of projects ready to cut and just need to get on with it! 

The challenge over at Bitten By The Bug 2 this week is to include a bird on a project but the DT did such a fantastic job of all the popular bird cuts and I wanted something different.  A few years ago, I had to stop myself buying the Sentimentals cart just for this one image of a bird carrying an envelope in its beak.  Perfect! ( And free on my HSN subscription!)  

The cut is very simple with just two layers, so I needed to add dimension and interest in the background.  I love this daisy overlay and it cut beautifully.  The sentiment was written with the Explore.  Love, love, love this feature of the Explore.

Back to my Grandma duties!   Thanks for visiting with me today.  : ) Christine


Thursday, April 17, 2014

Trekkie Alert and Pinterest Party

Narelle, The Non Crafty Crafter has a wonderful blog full of the most useful information for Cricut-eers.  This week she is holding her very first Pinterest Party.  The idea is to pick a project that has been pinned on Pinterest, use the pin to inspire or, as in my case, totally scraplift and then post your project on Narelle's blog.

I have been intrigued with this pin from The Weekend Stamper for some time. 

Star Trek Christmas Card

She made the Enterprise from punches and helpfully provided a picture of the pieces she used.  All I had to do was recreate the punched pieces as closely as possible in Design Space and then cut them out and piece them together.   I wrote "Boldly Go" using a font from George and Basic Shapes. Fun!

Hop on over to Narelle's blog and see what other crafters have recreated.   Thanks for visiting with me today.  : ) Christine


Wednesday, April 16, 2014

Secret Garden

I was at my very first CK Scrapbooking Convention on Saturday.  It took considerable restraint... but I was a good girl and only bought paper ('Cause I need more paper! LOL!) including the Graphic 45 Secret Garden stack.  The card I had made for my DD's birthday went into my stash, and I plugged in the Explore and got busy with the Anna Griffin Make and Take Butterfly card.  I love that you can modify the design or enjoy the design just as it comes.  I popped up the butterflies on two layers of foam dots for lots of dimension and wrote the word 'Celebrate' with a Recollections glitter pen inserted in the Explore.

When our DD was little, DH read "The Secret Garden" to her at bedtime and it remains one of her favorite books to this day.  So when she opened her card it brought back many happy memories.  : )


The little gift bag is an SVGCuts file imported into the Explore.  The bottom layer of the butterfly was cut in vellum.   It's SO easy cut different materials with the Ex.  (I am going to try a felt flower on a headband for G next!) The bag is fastened with a rhinestone brad.


Thanks for visiting with me today. : ) Christine     Happy Birthday KJ!  LYM 


Sunday, April 13, 2014

Another Card - in - a - Box!

This one is a Lori Whitlock SVG file.  I just love the scallops on the sides.  I added a few extra pop ups and lots of gold stickles.

 S had a hard time figuring out how to pop it open and Grandpa had to help.  I was secretly much impressed that he knew how to do this as I think he looks at my 'stuff' and just says, "Lovely!" or "He'll like that!" without paying much attention.  Guess I was wrong!  LOL!

Thanks for visiting with me today!   Happy Birthday sweet Sophia!   : ) 

Wednesday, April 9, 2014

Spring Break!

And although I no longer HAVE Spring Break, we celebrated retirement by coming to the beach this week!  Here's a view from the RV of the ocean and Cocoa and Sam enjoying the sunshine.  Bliss!


I brought along my latest box of goodies from Simon Says Stamp and enjoyed the challenge of making the sample cards with the few things I brought along in the RV.   I can see me getting a lot of use from this stamp set.  It's so much fun! 

Time to light the BBQ!  Thanks for visiting with me today!  : ) Christine


Saturday, April 5, 2014

Help needed ASAP!

I've been seeing these beautiful accordion cards on Pinterest with each panel featuring one of the seasons.  I was inspired to use the Kanji symbols for the seasons from Pagoda and surround them with some gorgeous washi paper that has been in my stash forever!

Well, I am kinda pleased with the inside.  It looks like I imagined it would look, but... the outside is so ugly!   It doesn't fold neatly, odd edges stick out here and there and I wish I hadn't tried to round the corners.   So my question is, since I haven't seen any examples of the card folded up, is this normal?  Does it just not fit together nicely because of the sheer bulk of the 4 folds?  My valentine accordion card was not too pretty on the outside either.   Any suggestions?   All help gratefully accepted because I am determined to make one with 5 folds for my DGD's birthday! Agggh!  Help! Help!

Thanks for visiting with me today.  : ) Christine


Thursday, April 3, 2014

Play Hoops!

One of the neat things about my DGDs is that they will try anything!  They have tried martial arts, dance, golf, tennis, volleyball, art, cooking to name just a few activities.   Recently,  6 year old G played basketball for the first time in a league that practiced in our local elementary schools.  It was such fun to go see her play every Saturday. (Except for the bleachers! Ouch!)   In her last game, G scored 2 baskets.  : )

I wanted to tell her how proud we are of her and found this fun basketball paper in a DCWV stack.   I made a teepee card and used my Create - A - Friend cart to decorate each side.  The little girl is on an Action Wobble.  Such a fun card to make, although someone (DH!) objected to the ribbon on the hoop!


Thanks for visiting with me today.  : ) Christine


Tuesday, April 1, 2014

At the Beach

Several years ago my sister visited the lovely city of White Rock, and decided that she was going to live there.  Since she is quite persistent and determined, her dream came true!  White Rock is a sea side community and my sister regularly walks her dog on the beach. It is a great place for vacationing relatives too!

When I saw the phrase, "Life is better at the beach" in the Silhouette - on - line store, I naturally thought of her.  Here is the wall decor my DH and I made to celebrate her time in White Rock.  DH contributed the 'white' rock and the sand purloined from the local golf club!  Attaching that sand to the bottom of the frame took considerable ingenuity, I can tell you.  LOL!

The dog walker cut in vinyl comes from A Child's Year and was cut with the Explore.  The background beach is by DCWV.

Thanks for visiting today.  It's a rainy day and we are off to IKEA.  : )  Christine


Saturday, March 29, 2014

Easter is coming!

What a busy few days!  My sister is here from BC and we have shopped, shopped, and shopped some more!   As we relaxed over a cup of tea yesterday, I showed her the new Design Space software and together we designed this Easter card.  It was fun!

One of the things that I loved about the Gypsy was welding shapes into window cards and I wondered if I could do this with Design Space.  Yes!   Easy peasy lemon squeezy!   And it is much easier to see that the shapes have successfully melded into one piece on the larger screen. 

The daffodils are from Art Nouveau and I chose them so that I could link 'our' card with the Spring Flowers challenge at Bitten By the Bug 2 here

Here is the welded card shape:-


And the completed card.   It really is such a pretty, pastel yellow but the shimmery surface made it hard to photograph.


Thanks for visiting with me today.  I really appreciate your comments and interest in my blog.  Thank you!  Lastly, a special shout - out to a friend in Chilliwack!

Wednesday, March 26, 2014

That 'French Manor' Peacock!

Several years ago, PC launched the Cricut Circle and sent all the members an exclusive cart called 'French Manor.'  THE most popular cut was, without a doubt, this peacock.  It was everywhere!  Now it's my turn to show you my version of  'the peacock.'   (My family will tell you that I'm always a little late to the parade!)

I used the DCWV Shimmer stack and embossed the background to give it an East Indian look.  The center stair step card has been around forever too, but is the perfect card form to use when you want to put special focus on the image.  Wouldn't this card take on a whole different look with brighter background papers?  If I didn't have to put Master J's toys away and clean the bathrooms before my sister comes tomorrow, I'd head right up to the craftroom.  LOL!

The FCCB challenge this week is to feature a bird somewhere on your project.  Go take a look at what the DT came up with.  Love that Art Nouveau hummingbird!


Thanks for visiting with me today!  : ) Christine

Thursday, March 20, 2014

Little Canvas Totes

... decorated with iron - on vinyl for a couple of my favorite young ladies!  I FINALLY figured it out after wasting almost all the roll of vinyl and then watching several videos!  (Hopefully, I learned a little something there!)    The lovely font is from the Folk Art Festival cart.


Thanks for visiting with me today!  : )  Christine

Tuesday, March 18, 2014

Create-a-Critter Easter Treats

Several years ago, DH and I were visiting the Yorkshire Dales (in England) over Spring Break.  It was an absolute visual treat!  Imagine wooly lambs gamboling in every field, love struck pheasants in gorgeous plumage strutting across the roads intent only on the drab female hiding in the opposite verge, and brilliant yellow daffodils in their hundreds lining the road sides - the very embodiment of Spring.  Wonderful! 

Last October, we planted daffodil bulbs along the drive to our house as reminder of our trip (and our birthplace!)  and they are just beginning to open in today's lovely sunshine.

Daffys mean Easter to me and I went to the Craft Room to make treats for OHM.  You just can't go wrong with bunnies and chicks from Create - A - Critter, can you?   I used the writing feature of my Explore to write a 'Easter Blessings' on a tag for the back of the critters.  Love this feature and never need buy another sentiment stamp again.      Ha!  Just kidding! 


Happy Spring and thanks for visiting with me today.  : ) Christine

Friday, March 14, 2014

The winds of change...

For the last few years, the winds of change have fairly howled through the Education world and affected even those at the youngest levels.  I could not resist buying this stamp from Verve because it was the mantra I repeated to myself when 'they' insisted on my teaching as though my five year olds were mini high schoolers!


Then, of course, when you've bought the stamp, you have to do something with it and here's my card of encouragement for a former colleague who is in danger of being capsized!   The card comes from Wild Card 2,  and the ship from the San Francisco digital set.  The compass comes from the New England Shore digital set and the mat for the stamp from Elegant Edges.

See how sneaky that Cricut is?  I only own one of these carts but LOVE having access to most of the images in the library through my trial subscription.  I can see an increase in my crafting budget will be necessary!   Thanks for visiting with me today.  : ) Christine


By the way, Grandma got a bit sneakier today. Here is what Master J is doing at the moment - he's fast asleep!  : )


Monday, March 10, 2014

St. Patrick's Day card with the Explore

It's a dull, grey rainy day.  (DH and I are going to cheer ourselves up with a run to Costco this afternoon for some retail therapy!)  Trying to take pics of my latest card would be impossible without the light box my DD lent me.   Thank you KJ!

Today, I have been figuring out how to 'attach' with the Design Space software so that my images cut as I have arranged them on the canvas.  If I don't 'attach' then the software puts the images all in the top corner and that, obviously, was not what I wanted!  I also played with the alignment on the X and Y axis to get them lined up.


Inside the card, the Explore used an American Crafts fine point Slick Marker to write the words from the St. Patrick's Day subway art in Word Collage.  The "Lucky Day" cut comes from the Phrases cart.  This was such a fun card to put together!


Today's challenge on the Exploring Cricut and More blog, is called "The Luck of the Irish" and we are asked to include a shamrock.  I guess I did that and more!

The challenge at BBTB2 blog, is a St. Patrick's Day project.  We're all using up our stash of green paper for sure!

Right!  Off to Costco, we go.  Hope you have a lucky day!  Thanks for visiting with me.
     : ) Christine


Sunday, March 9, 2014

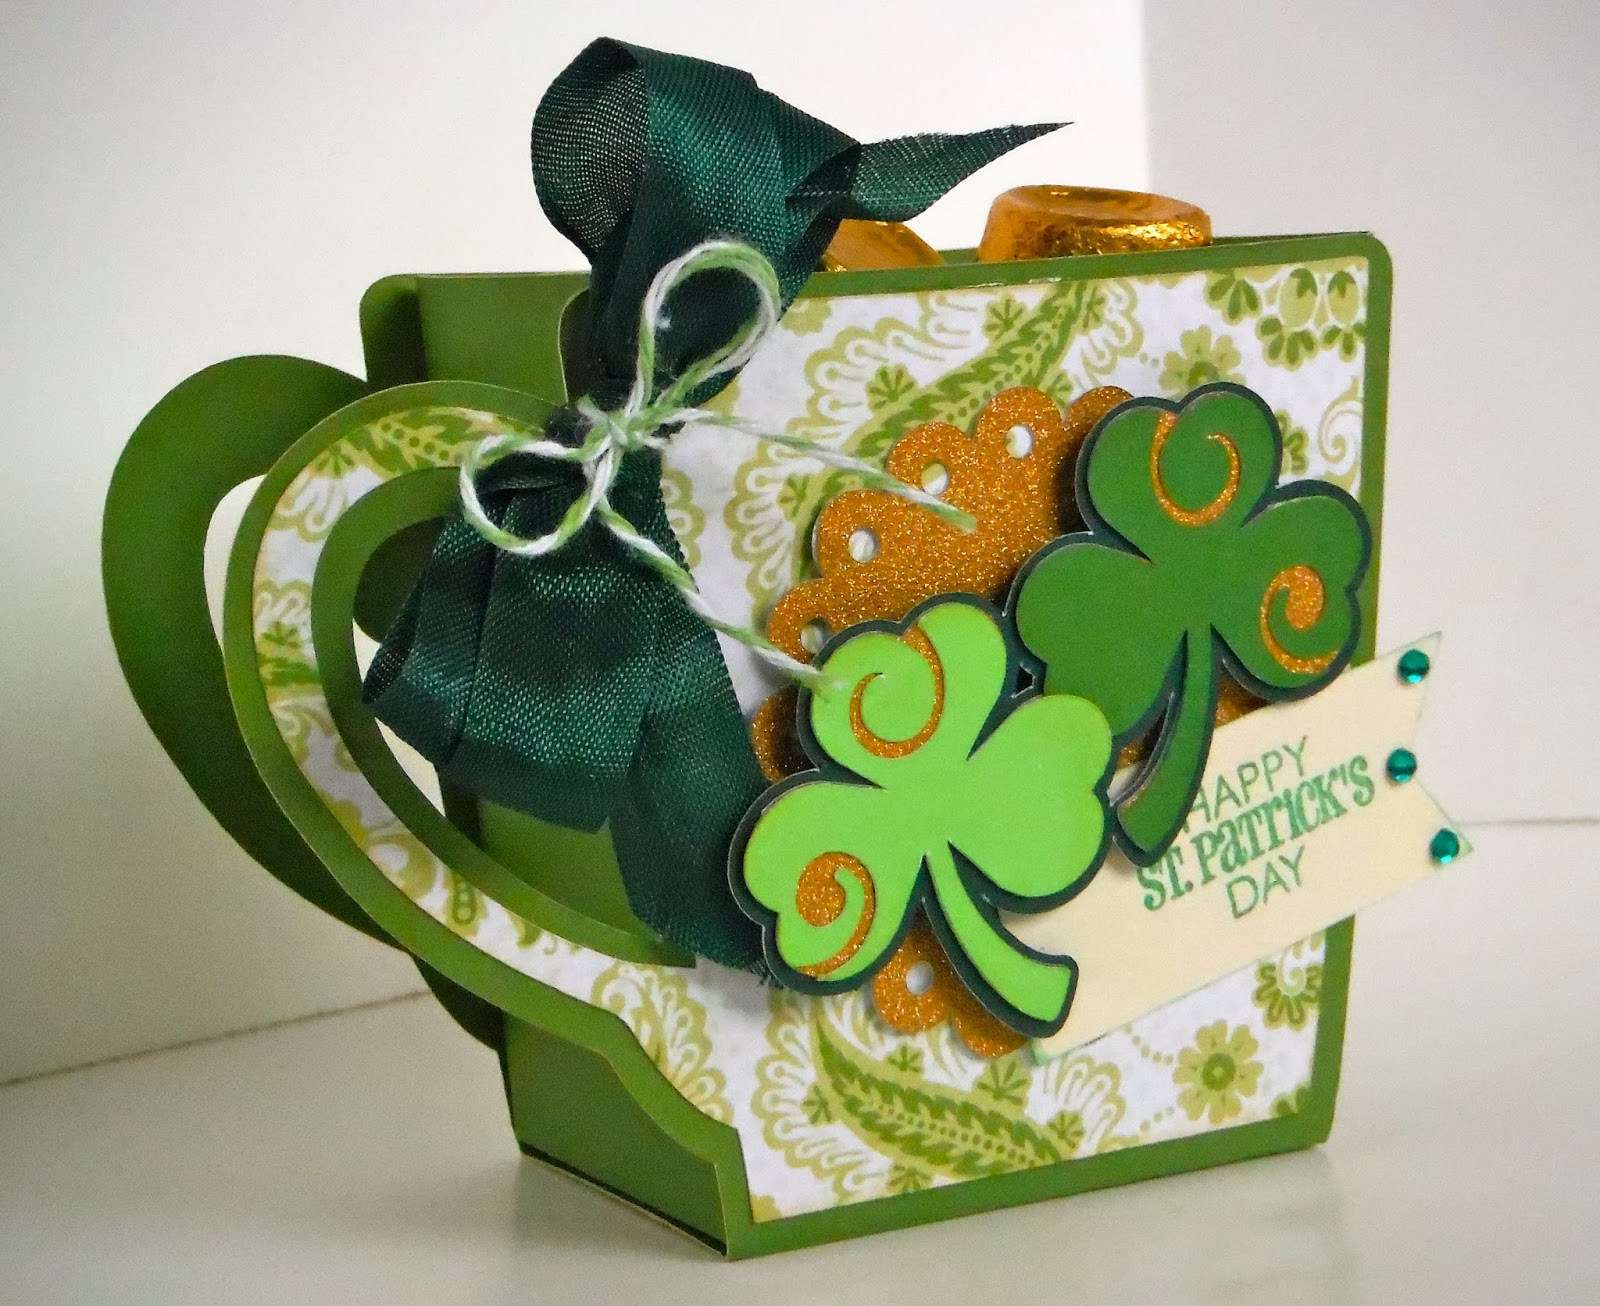
A Cup O' Cheer for St. Patrick's Day!

I loved this cocoa mug that Susan made for the CARDZ TV Valentine challenge and found it on the Silhouette store AND as an svg from Lori Whitlock.   I wondered if the Explore would cut the svg and so tried to import it into Design Space.   Apart from the funky score lines, it worked!

I love that the software separates out all the layers and allows me to add color so that I can get an idea of how it is going to look when it is put together.

I 'hid' the heart and the center petals in the mat and imported the shamrocks from Celebrate With Flourish.  (I have never been able to cut the left shamrock properly, and the Explore did no better. My 'work around' is to cut the right shamrock again with the card stock reversed so that I can flip the image over when I layer the cut.) So nice to have imported images and Cricut cuts in the same software and cut on the same machine.  Oh the possibilities!

I am linking my mug with the 3D challenge #2 at CARDZ TV.  It seems appropriate! 


Thanks for visiting with me today!   : ) Christine


Blogger Template By Designer Blogs